Can you feel it? The warmth of the sun, the sound of crashing waves, and the salty breeze in your hair. The call of the coast is irresistible, but for many, the excitement of a beach day gets washed away by one major worry: mobility. That beautiful, soft sand can quickly become an impassable barrier, turning a dream trip into a stressful ordeal.
But what if it didn’t have to be that way?
This guide is your all-access pass to a stress-free day of sun and surf. We’re ditching the “what-ifs” and diving into the world of lightweight and specialized beach mobility solutions—from all-terrain wheelchairs to clever hacks that make the shore accessible for everyone. Forget worrying about getting stuck in the sand. It’s time to trade mobility concerns for making memories. Let’s get you to the water’s edge, where you belong.
Your Best Beach Day Ever Starts With a Plan!
The secret to a perfect, relaxing day on the coast isn’t just about remembering the sunscreen and snacks. It’s about planning ahead to eliminate stress before you even leave the house. A little forethought can transform a day filled with potential obstacles into one of pure, unadulterated joy. This comprehensive checklist is designed to guide you through every stage, from initial research to the post-beach cleanup, ensuring your only worry is whether to build a sandcastle or take a nap.
Phase 1: Pre-Trip Planning (The Week Before)
Success loves preparation. A week before your trip, take some time to lay the groundwork. This is where you turn potential logistical nightmares into a smooth, seamless plan.
Research Your Destination: Become an Accessibility Scout
Not all beaches are created equal when it comes to access. Before you commit, do some digital reconnaissance.
- Visit Official Websites: Start with the official city, county, or state park websites for your chosen destination. Look for an “Accessibility” or “Amenities” page. This is often the most reliable source for information on handicap beach access, parking, and available facilities.
- Read Reviews and Blogs: Search for terms like “accessible beaches near [your destination]” or “wheelchair access at [beach name].” You’ll often find firsthand accounts from other travelers that provide invaluable, real-world insights. This kind of research is a cornerstone of good accessible vacation planning.
- Make a Call: When in doubt, call the local parks and recreation department. A quick conversation can confirm details that a website might miss, like the current condition of a ramp or the availability of on-site staff.
Look for a Paved Path to Paradise: Mobility Mats
One of the greatest innovations in beach accessibility is the roll-out beach pathway, often called a Mobi-Mat. These firm, non-slip surfaces are laid over the sand, creating a stable path from the boardwalk to the firmer sand near the water. Check if your target beach has these installed—it’s a total game-changer for anyone using wheels.
Decide on Your Gear: Rent or Bring?
Consider your needs for the day. Will you be gone for a few hours or the whole weekend?
- Renting: If you’re flying to your destination or only need a chair for a day, a beach wheelchair rental is a fantastic, hassle-free option. It saves you the trouble of transporting bulky equipment.
- Bringing Your Own: If you’re a frequent beachgoer, investing in your own adaptive beach equipment might be more cost-effective and ensures you always have a device tailored to your specific needs.
Book Your Rentals in Advance!
If you decide to rent, don’t wait until the last minute, especially during peak season. Popular items like a lightweight sand wheelchair or a floating beach wheelchair can get booked up weeks in advance. Secure your reservation early to avoid disappointment.
Phase 2: Choosing Your Primary Mobility Tool
The right tool for the job can make all the difference. The world of beach mobility solutions has expanded far beyond a one-size-fits-all approach. Here’s a breakdown of the top contenders to help you find your perfect beach buddy.
Option A: The Beach Wheelchair
This is the undisputed champion of sand mobility. Designed specifically for the challenges of a coastal environment, it’s a far cry from a standard wheelchair.
- Best For: Individuals who are non-ambulatory or need to travel longer distances across soft, deep sand.
- Key Feature: The Wheels: The magic is in the large, gray balloon wheels for sand. These low-pressure tires distribute weight over a wide surface area, allowing them to “float” on top of the sand instead of digging in.
- Key Consideration: Transport: These chairs can be bulky. While many models disassemble or fold, you’ll likely need an SUV, van, or truck to transport them. Always check the dimensions and weight before committing. When considering how to push a wheelchair on the beach, these specialized chairs make it surprisingly easy for a companion.
Option B: The Beach Walker
For those who are mobile but need extra support and stability on uneven surfaces, a beach walker is a liberating tool.
- Best For: Individuals who can walk but need support to prevent falls and reduce fatigue on the sand. It’s one of the most popular mobility aids for seniors on sand.
- Key Feature: Oversized Wheels: A good all-terrain walker for sand will feature large, rugged wheels that won’t get bogged down like the small wheels on a standard walker. Many also come with a built-in seat, giving you a convenient place to rest anytime.
- Key Consideration: Wheel Type: Look for a sand-friendly walker with wheels that are wide, not just large in diameter. While not as effective as true balloon tires, they offer a significant advantage over standard models.
Option C: The Portable Beach Mat System
This option provides a stable foundation for a wider range of mobility devices, including standard wheelchairs (on firm sand), walkers, and canes.
- Best For: Creating a personal “home base” on the sand and a clear path to it from the main boardwalk or access point. It’s a versatile solution for families with diverse mobility needs.
- Key Feature: Portability: A portable beach access mat rolls up into a compact, manageable size, making it easy to transport and deploy wherever you decide to set up camp.
- Key Consideration: Length: These mats come in various lengths. Consider how far you typically travel across the softest part of the sand to determine the length you’ll need. You might need more than one to create a comfortable setup.
Phase 3: Packing Your Gear Bag (The Day Before)
You’ve got your plan and your primary mobility tool. Now it’s time to pack the support kit. These small items can solve big problems and elevate your comfort level from good to great.
The Mobility Kit: Your Beachside Toolbox
- Tire Pump: If you’re using a beach wheelchair with balloon tires, a small hand pump is non-negotiable. Temperature changes can affect tire pressure, and a quick top-off can ensure a smooth ride.
- Small Toolkit: A multi-tool or a few basic wrenches can be a lifesaver for tightening a loose bolt or making a quick adjustment.
- Zip Ties & Bungee Cords: These are the unsung heroes of any gear bag. They can secure a wobbly umbrella, attach a bag to your chair, or provide a temporary fix for just about anything.
- Freshwater Spray Bottle: Keep a simple spray bottle filled with fresh water. It’s perfect for a quick rinse of your hands, feet, or crucial moving parts on your equipment to keep sand from grinding in the mechanisms.
The Comfort Kit: Upgrade Your Experience
- Extra Cushions or Seat Pads: Beach wheelchair seats are typically made of durable, quick-drying mesh. An extra cushion can provide added comfort for a long day of lounging.
- Detachable Umbrella: Personal shade is a must. Look for a clamp-on or universal-fit umbrella that can easily attach to the frame of your wheelchair or walker.
- Clip-On Cup Holders and Bags: Keep your drink, phone, and sunscreen within easy reach. These simple accessories minimize the need to twist and turn, keeping you comfortable and relaxed.
Phase 4: At the Beach (Day-Of Execution)
The day is here! With your planning and packing complete, all that’s left is to execute your plan and enjoy the sun.
Arrival and Unloading Strategy
Try to arrive early to snag a prime accessible parking spot. Unload your gear in the parking lot and assemble anything that needs it on the stable pavement before heading onto the sand.
Deploy Your Mat First
If you’ve brought a portable mat, roll it out from the end of the public access point toward your chosen spot. This creates your “runway” and makes transporting the rest of your gear much easier.
Navigating the Sand
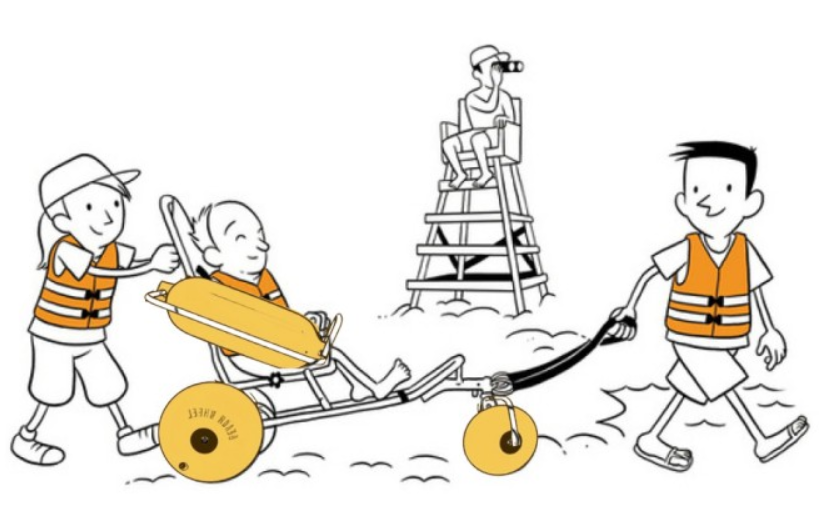
Even with the right equipment, navigating sand with mobility issues requires a bit of technique. It’s often easier to pull a beach wheelchair backward through particularly soft or deep sand. If you’re with a group, have one person pull from the front while another pushes and steers from behind.
Setting Up Your “Home Base”
Arrange your chairs, towels, and cooler on or around your beach mat. This creates a sand-free zone that’s easier to move around on and keeps your belongings from getting coated in sand.
Water Safety Check
If you’re using a floating beach wheelchair, safety is paramount. Never use it alone. Always have a capable attendant with you in the water. Pay close attention to currents and surf conditions. This incredible tool is a gateway to adaptive water sports, but it must be used responsibly.
Phase 5: Packing Up & Post-Trip Care
A little care at the end of the day will protect your investment and ensure your equipment is ready for your next adventure. Salt and sand are highly corrosive and abrasive.
The All-Important Rinse (Before You Leave)
Use the public showers at the beach or your freshwater spray bottle to give your equipment a thorough rinse. Focus on wheels, axles, and any moving joints. Getting the salt and sand off before it dries and hardens is the single most important step in cleaning mobility equipment after beach use.
Stow Your Gear for the Trip Home
Disassemble your equipment on the pavement, not the sand, to keep parts clean. Place a towel or blanket down in your vehicle to catch any residual sand and water.
Once Home: A More Thorough Cleaning
Give your wheelchair or walker a proper wash with mild soap and fresh water. Use a soft brush to get into crevices. Dry it completely with a towel or let it air dry in the sun to prevent rust and corrosion. Check your tire pressure and lubricate any moving parts as recommended by the manufacturer.
Don’t Forget These Accessibility Hacks!
Sometimes the simplest solutions are the most effective. Here are a few pro tips from seasoned beachgoers:
- The Rope Trick: For extra-soft sand, attach a long rope to the front of the wheelchair frame. This allows a second person to walk ahead on firmer ground and pull, making the job of the person pushing much easier.
- The Multi-Purpose Bucket: A simple 5-gallon bucket is a fantastic beach tool. Use it to carry supplies, build a massive sandcastle, or fill it with ocean water to rinse sandy feet and equipment right at your spot.
- Pack a Transfer Board: If transferring from a wheelchair to a beach chair or towel on the sand, a small, foldable transfer board can provide a stable and safe bridge, increasing independence.
Checklist Summary: Your Printable Quick-Reference Guide
Here’s a quick-glance summary of everything you need for a perfect, stress-free beach day.
One Week Before:
- Research beach accessibility (websites, blogs, phone calls).
- Confirm accessible parking, restrooms, and concessions.
- Check for public mobility mat systems.
- Decide: Rent or bring your own mobility gear.
- Book rentals well in advance.
The Day Before (Packing):
- Mobility Tool: Beach wheelchair, walker, or mat system.
- Mobility Kit:
- Tire pump
- Multi-tool/wrenches
- Zip ties & bungee cords
- Freshwater spray bottle
- Comfort Kit:
- Extra seat cushion
- Detachable umbrella
- Clip-on bags/cup holders
- General Beach Gear: Sunscreen, towels, snacks, water, etc.
Beach Day:
- Arrive early for the best parking.
- Assemble gear on pavement.
- Deploy mat first to create a runway.
- Pull chair backward through the softest sand.
- Set up a comfortable, accessible “home base.”
- Practice water safety if using a floating chair.
After the Beach:
- Rinse all equipment with fresh water before leaving the beach.
- Stow gear on a towel in your vehicle.
- Perform a thorough cleaning and drying at home.
- Store equipment in a clean, dry place.
Conclusion: Plan, Pack, and Play!
The call of the ocean is for everyone. With the incredible advancements in adaptive beach equipment and a little bit of planning, a day of sun, sand, and waves is no longer a dream—it’s a destination. By thinking through the logistics ahead of time, you free yourself from the stress of “what if” and open yourself up to the joy of “right now.”
So use this checklist, pack your bag, and get out there. The beach is waiting for you. Your passport to paradise has been stamped.